https://jolla.zendesk.com/hc/en-us/articles/360002996893-Xperia-X-devices-How-to-use-the-Recovery-Mode
2.1 Forcing Xperia to Recovery Mode
- Disconnect USB cable from Xperia
- Turn Xperia OFF
- If you have the fastboot drivers (Windows) or fastboot tools (Linux, Mac) already installed on your computer, skip to the next step. If not, install them now - the instructions are:
- Windows computer: chapter 2 in Sailfish X instructions - Windows)
- Linux computer: chapter 2 in Sailfish X instructions - Linux)
- Mac computer: chapter 2 in Sailfish X instructions - Mac).
- Force your Xperia to fastboot mode:
- hold Volume Up key down and connect USB cable
- ensure that the LED at the top of the display area is lit in BLUE colour
(if not disconnect cable, release the key and try again)
- Open Terminal app on your computer
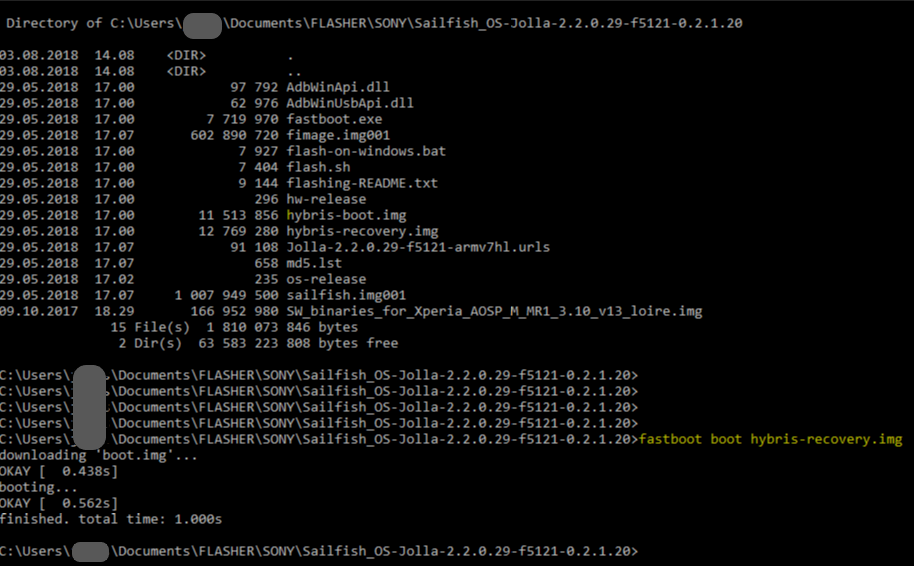
- Go to the Sailfish directory (see chapter 3 in Sailfish X instructions - Windows or chapter 3 in Sailfish X instructions - Linux or chapter 3 in Sailfish X instructions - Mac).
This is the directory to which you have previously downloaded and
unzipped the Sailfish OS for installing it. The next picture below shows
the content of such a directory.
- The following command will enable the Recovery Mode (the BLUE LED should be lit at this point)
On Windows:fastboot boot hybris-recovery.imgOn Linux or Mac:sudo fastboot boot hybris-recovery.img

Detach the USB cable now.
After this there should not be any BLUE light on your Xperia. Instead, the following text should appear (in a really tiny font) at the top of Xperia display :
(Nota: asegúrese de que el cable USB que se está usando es el mismo que se usó para flashear el teléfono. Algunos cables hacen que el modo fastboot no se active y que por lo tanto, el teléfono se inicie en modo de arranque normal).
2. En el menú de recuperación, seleccione SHELL
3. Su sistema de archivos raíz debería estar montado por defecto en /rootfs, verifique que realmente lo esté. Móntelo manualmente si es necesario.
4. Ejecute el siguiente comando:
chroot /rootfs /bin/bash
5. Después que chroot se haya ejecutado con éxito ejecute para desinstalar la aplicación deseada:
rpm -e nombre-de-la-aplicacion
Entonces rpm detectará un chroot y no realizará algunos pasos (no estoy muy seguro de cuáles), pero para revertir los cambios del archivo debería ser suficiente.
6. Salir del chroot con:
Ctrl-D
7. Salir del shell del recovery con:
Ctrl-D
8. De nuevo en el menú de recuperación, seleccione la opción REINICIAR (REBOOT).
(Debido a que no hay dbus / systemd disponible en modo chroot o recovery, pkcon no se puede usar para desinstalar cosas, por lo que aquí se usa rpm directamente, cosa que normalmente NO se recomienda).


0 comentarios:
Publicar un comentario